- Free shipping
- 9% less
Your cart is empty
Subtotal:$0.00
 |
Southern Car Parts is a retailer specializing in aftermarket parts and accessories for a variety of vehicles, with a strong focus on Corvette models. Offering a wide selection of high-quality products, including performance upgrades, styling enhancements, and restoration components, Southern Car Parts is dedicated to helping automotive enthusiasts enhance and personalize their cars.
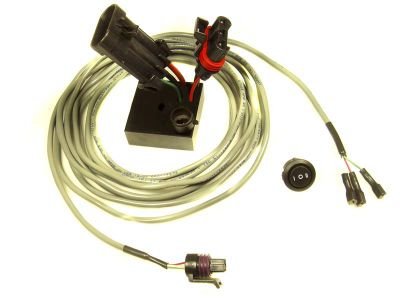
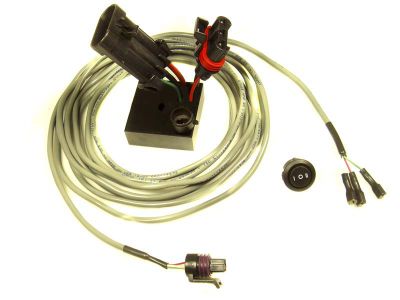
This brand new Plug-And-Play control module installs under the hood, at the fan connector, and is designed to manually control the PWM coolant fan found on the C6, Z06 and ZR1 Corvette. When the need arises to manually cool the radiator down, this module gives you complete control of the fan with the simple flick of a switch. This kit can be installed in less then one hour, once you decide on where you want to place the control switch. This switch matches the style and look of cockpit switches used on all the C6 Corvettes.
Comes with easy to follow installation instructions.
Pictures below are of completed installation with optional mounting bracket
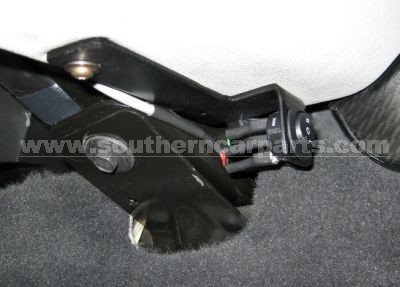
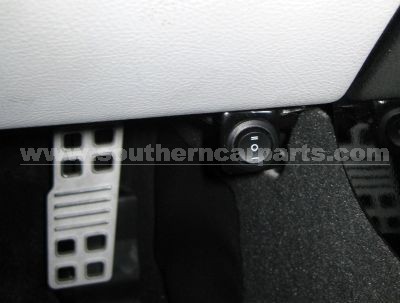
Installation instructions shown below...
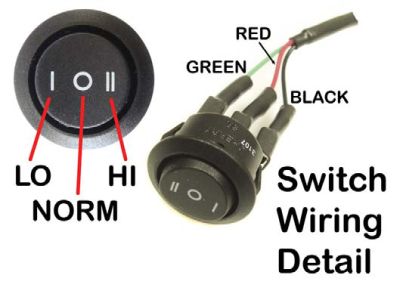
The switch wiring can be installed easily, without the need to cut a hole in the firewall. The wiring can be fed thru the upper door jamb, driver or passenger side, and hidden under the weatherstrip door seal into the passenger compartment. The location of the switch can be anywhere desired. First, locate the fan connector on the passenger side, near the bottom of the fan shroud. Unplug the connector and insert the enclosed module into the connection being sure the connectors are fully seated. The module can simply hang there on the connectors. You can now run the switch harness from the module to the passenger compartment location where you want the switch positioned. Start by plugging the round connector into the receptacle in the module. Next, select a location for the switch. You will need to cut a 20mm hole (approximately 11/16”) into the panel you wish to insert the switch. Once you have installed the switch, run the wiring from the harness and insert the three female connectors as shown in the switch wiring detail below. Note RED wire is common, BLACK wire is High, GREEN wire is Low, and RED wire is Common +12V:
Once the switch wire connectors are attached, you are ready to go. Keep the switch in the center (O) “NORMAL” position for normal ECU fan control. Press the (I) to manually run the coolant fan on low, or the (II) to manually run it on high. Remember, manual control of the fan will make it run without the key in the ignition so be aware that you might kill your battery if left on for long periods of time. NOTE: There may be a coolant fan code set while the switch is in manual control, which will go away when switched back to normal mode.
INSTALLING THE OPTIONAL SWITCHPLATE
1. There are Torx head screws holding on the lower panel
directly under the C6 steering wheel. Remove the furthest
right hand screw using a Torx T15 driver.
2. Route the fan control wiring to the right hand side of the
foot well to the area near the switch plate mounting area.
3. Push the round fan control switch into the switch plate through
the front of the plate and rotate the switch to adjust for the
appropriate switch orientation.
4. Connect the wires as per the installation instructions.
5. Insert the Torx screw through the bottom of the switch plate
and tighten until plate is secure. The hole is oversized so you
can move and slightly wedge the switch plate behind the vent
as seen inn the picture. This will make the switch plate more rigid.
6. Test the function of the switch and plate. Tighten the screw if
necessary to secure the switch plate. Two finger operation of the
switch may be necessary using your thumb and index finger.
Shipping
We utilize UPS, Fedex, and USPS for all of our shipping needs. Carrier choice is based upon availability and needs of the customer and is the sole discretion of SouthernCarParts. We always try to ship within 24 hours of order placement (do to the custom nature of some products, shipping within 24 hours is impossible, actual shipping time frames will be listed in the product description). Please keep in mind that some products such as Custom Fit Car Covers, Lloyds Floor Mats, Painted accessories, and Racemesh Products can take 3 -10 days to ship and are charged at time of order placement. Racemesh products take 4 weeks to ship as they are made to order.
Returns
Should you need to return a part for refund, exchange, or credit, please contact our returns department within 30 days of purchase at orders@southerncarparts.com for a Return Merchandise Authorization (RMA) number. Most problems, such as installation, can be solved with a telephone call (888-631-1433). Southern Car Parts will not accept returned goods without prior authorization and an RMA# written clearly on the exterior of the box. The customer is responsible for freight on all return orders. Parts authorized to be returned, on a non-exchange basis, are subject to a 20% restocking fee. Returns will only be accepted within 30 days of the original date of shipment. Custom painted parts - Once these parts are started, we can refund you less the paint(chemicals) that have been used. Exception is rear spoilers and front splitters, we can refund less 20%.
Custom-made-to-order items are NOT returnable. This includes embroidered floor mats, interior embroidered items, and car covers.
Damages in Shipping
All damages from shipping must be reported to Southern Car Parts within two business days from tracking number delivery confirmation. After two business days, damages become the responsibility of the customer.